The Drying and Curing Process
After a lot of work, you have finally harvested your crop – and we know you can’t wait to try those fragrant buds! Unfortunately, your job as a grower isn’t over just yet. After harvesting, there is still another crucial component for turning your flowers into a finished product – the drying and curing process.
In order to end up with the best quality buds, you need to prepare them through a process called curing. This needs to be started as soon as you harvest your plant. The process begins with slowly drying the freshly harvested buds in a controlled environment and is done for multiple reasons.
Curing is important as it affects the flavor of your buds as well as the smoke quality. Properly curing your buds helps to break down the chlorophyll in the plants. This dramatically improves taste and smoothness – plus it helps to bring out the flavors of your specific strain. Curing will also remove the “hay” or “grass” smell commonly associated with newly harvested buds but definitely not what you want in a final product. Additionally, the process of curing helps to reduce the harshness of the final product, which will mitigate potential side-effects such as coughing or migraines.
The first step is drying, which begins with cutting down your plants and organize them. As you gain experience, you will create your own preferred method of cutting and trimming. When starting out, we suggest cutting branches individually until the entire plant has been harvested. Once that is complete, you can remove the large fan leaves and trim the smaller ones; too many leaves will generate a harsher smoke for the end-user.
Many home bud trimming operations find the use of a machine, such as the Centurion Tabletop Pro, a perfect asset to help with trimming process, which can be quite time consuming.
How to Dry Marijuana
There are several different methods that you can find for how to dry marijuana, such as freeze drying, water curing or even ice drying. That being said, these are quick-dry methods and are not recommended. As excited as you are to try your freshly harvested buds, you don’t want to ruin the flavor or increase potential effects by drying them out too quickly. Buds that are quick-dried in a dehydrator, a stove using dry ice or in a microwave (yes, it’s been done) will smell awful, leave a terrible taste in your mouth and often result in migraines or paranoia. This is because quick-drying your buds does not give them proper time to cure. Slow-drying your cannabis is the simplest and purest way to get maximum results.
The optimal environment for drying is 70 degrees Fahrenheit or 21 degrees Celsius and a humidity level of 50%. Even drying your buds in a mildly warmer temperature, such as 85°F (30°C) can ruin valuable terpenes (what generate the smell) as well as affect THC and CBD.
To ensure you have the optimal environment, you need to consider the outside environment and time of year that you are harvesting and curing your plants. You will likely need to manipulate your environment using one or more of the following tools:
- An air conditioner to cool the air and lower the humidity
- An evaporator cooler to cool the air and raise the humidity
- A dehumidifier to heat the air and lower the humidity
- A humidifier to heat the air and raise the humidity
- Or a heater, which heats the air and often lowers humidity
Once you have your optimal environment ready, there are a couple options for how to dry marijuana plants. The most popular method used by most growers is to cut the branches into 12-16” sections, removing the unwanted leaves and them hanging them. However, some growers prefer to hang whole plants while others snip buds from branches and place them on drying racks. Again, you will determine what works for you as you gain experience with this part of the growing and harvesting process.
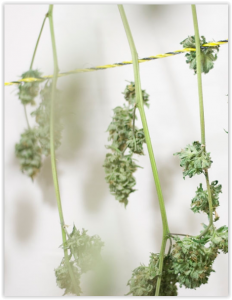
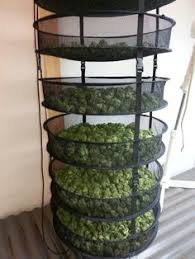
Photos: Hanging versus dry rack methods
Once you have set your plants up to dry the next step is to wait. Depending on the strain, it takes 3 to 10 days for your plants to be optimally dried. We know it is hard! You can tell they are ready when the outside of the buds feels dry to the touch. If you used the hanging method, it is ready when stems snap clean off versus bending or tearing.
It is important to note that if your buds are dry sooner than 3 or 4 days, it means that they dried a little too fast. That is okay! The majority of weed harvesting success comes from experience, which you don’t get overnight. Setting up optimal conditions is tricky the first time around, especially as bud size and density vary from strain-to-strain. Creating an optimal environment also requires trial and error depending on your conditions; just remember to live and learn for next time!
How to Cure Marijuana
Once your buds are dry, the next step is to cure them. First you need to manicure your buds and separate them from the branches, if you have not done this yet. You will find that trimming and manicuring your buds takes the longest amount of time. If this is already completed, you can move onto the next step in our how to cure marijuana guide. This involves taking your trimmed buds and placing them in mason jars. Pack the buds loosely and not all the way to the top – you don’t want them crushing each other.

Once your buds are tucked away in their jars, place them in a dark area and double check the environment. The optimal temperature for curing remains at 70 degrees Fahrenheit or 21 degrees Celsius. However, the process requires a slightly higher humidity level of 60-65% as compared to the drying stage. Growing and harvesting marijuana requires immense patience, the curing is no exception. However, since curing can contribute to 50% of your bud quality, it isn’t something you want to overlook.
To ensure proper curing, you must open each jar daily for the first week to inspect and air out the buds. When you are completing these daily inspections, you want to check for the following:
- Do the buds feel wet? You do not want moist buds touching each other, as it can spread bacteria and lead to mold. Wet buds need to be removed and allowed to dry for an additional 12-24 hours. The quicker you react to wet buds, the more likely you can remedy the issue.
- Do the buds feel moist? If you shake your jars and notice that some buds are still sticking together, then you are almost there but still at risk for mold. If you do notice this, you may be able to take the lid off the jars and leave them open for 1-4 hours if you live in a normal to dry climate. Otherwise, you will have to take the buds out of the jar and lay them out to dry once again.
- Do your buds feel good – not wet, not brittle? If so, then you have hit the optimal environment for curing. Your buds should be a little sticky, but move independently in the jar without grouping together.
- Do your buds feel too dry? At this point, there is likely not enough moisture in the jars and your buds have turned brittle and crumbly. In this case, you should just leave them alone or try and re-hydrate them.
While you are doing these inspections, keep your nose open for any ammonia smell coming from the jar. This signifies that the buds aren’t dry enough; continuing the curing process will result in a moldy product.
When learning how to cure marijuana, it can feel like a lengthy process. Proper curing requires 2-3 weeks for a quality product. However, many strains will benefit from 4-8 weeks to improve the quality even further. In fact, some strains do well when cured for six months or more!
Once you have waited the appropriate time for curing, you can finally sit back and enjoy your hard work. Trust us, that toke will be worth it.